Hey everyone. Sorry this one is coming at you a few days late. I’m currently in Mexico where the internet can be a bit spotty. This article is a piece that I wrote for Soccer Journal, and I think it’s okay that I post it here now that the magazine has been published.
Every youth coach I know – myself included – talks about how their teams are possession-oriented. They want their players to be assertive masters of the ball who can beat opponents in 1v1 situations and have the confidence to score comfortably.
I don’t contest that these are laudable qualities which are fundamental to developing young players. Yet, despite our best intentions, these are just words. They don’t mean anything until they’ve been actualized, and this is where things become convoluted and sticky.
Talk to Romeo Jozak, the former Technical Director of the Croation Football Federation, and he’ll tell you there’s a place for isolated technical training. Ask Todd Beane, Johan Cryuff’s son-in-law and founder of TOVO Academy, and he’ll adamantly disagree, saying that each exercise needs to have opposing players.
Yet I’m not here to discuss any of these topics. I simply believe that regardless of the exercises chosen, there are a few techniques that all As coaches can use to improve their ability to teach new skills.
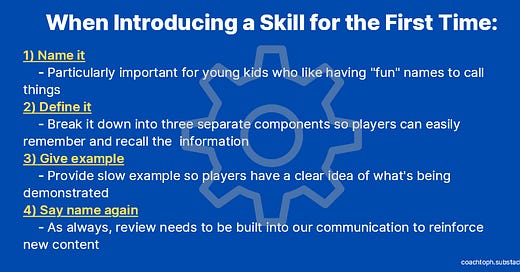
Name it
Before you teach anything, you must have a word for it. Even if it’s a tiny skill, like scanning, it needs to be named. Imagine how much harder it would be to build a fence with your friends if you couldn’t say the words “hammer” or “nail.” But that’s exactly what we ask of our players when they’re told to do something without knowing what it’s called.
Establishing a common shorthand is crucial to the teaching process – with a knock-on effect of strengthening a unique team identity. Our role as coaches is to teach new skills, but before we can do that it must be named, described, and then modeled so players have a clear idea of the term’s meaning.
Here’s an example: I want my U11 boys to practice receiving the ball across their body.
I gather the boys around and say “Alright team. Today we’re working on receiving the ball across our body. This means the ball rolls past the foot that’s closest to it, keeps rolling in front of us, and then we use the inside of the far foot to trap it.” (As I speak I’m slowly demonstrating the action so players can associate the stages of the description with clear mental images.)
You’ll notice that I said the name of the skill at the beginning and repeated it again at the end. The first time primed the players’ attention to the name of the skill and then reinforced it after seeing the model. The visual representation was broken down into three specific moments (the ball approaches the body, rolls in front of the body, and is then trapped) to avoid overloading their working memory. This makes it easier to correct the skill in the future because I can refer to one of these three key moments, which they’re already beginning to develop a mental model for.
Demonstrations
Children learn through trial-and-error, but that learning is catalyzed when it’s supplemented with real-world models they can observe (Bandura, 2008). For this reason, after introducing the skill, the coach must then demonstrate it within game-realistic conditions to ensure greater transference. This means use assistant coaches or volunteer players (that you trust to behave) to play the parts of opponents and teammates, and the demonstration should be performed in the part of the field where the skill is most likely to be used.
There is some housekeeping to this part of the teaching process as well that is helpful for any new coaches: Put players in a half-circle in front of you so they can all hear clearly, put their backs to the sun so they don’t have to strain to see you, and position yourself so there’s nothing behind you that will distract them.
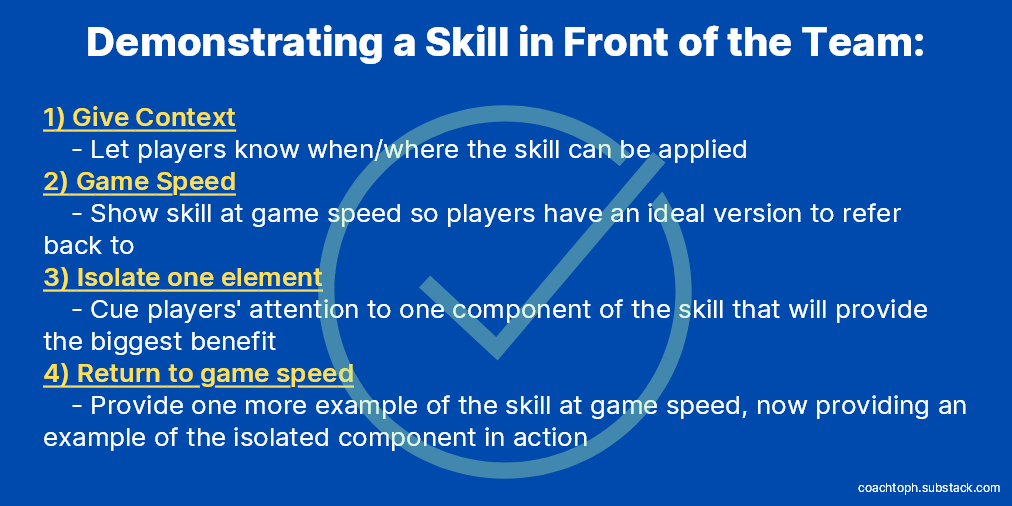
Once the players have been organized correctly there is a short demonstration process that should be followed. First, the coach demonstrates the skill at game-speed so players have a clear image of how it exists in real-time. Next, the coach gives a second demonstration and prompts the players to pay attention to a key part of the skill. Lastly, the coach gives one more demonstration at game-speed again.
Continuing the example above: The team is gathered around and can clearly see and hear me. I ask for two volunteers. One will pass me the ball and the other is specifically positioned to pressure from the direction the ball travels. We’re near the sideline and I tell the players that this skill is particularly helpful for midfielders who are receiving a pass from a wide player.
We perform the first demonstration at game-speed where the ball is passed, the defender applies pressure from the side, and I receive the ball across my body.
We quickly reset and I address the team, saying “Watch how I receive the ball closer to my heel and let it roll off my foot toward the toe,” and we run through the demonstration again. It’s performed at half-speed this time so the players can focus on the shape of the foot that’s receiving the ball.
Finally, with the players now primed to focus on a certain aspect of the technique, we repeat the passing and receiving sequence one more time at game speed.
Think Aloud
As previously mentioned, putting demonstrations in the context of game-like conditions helps players accurately decode on-field situations and correctly select techniques. But this relies on a crucial component of skill mastery: the ability to determine which information needs attending to and which can be discarded (Hüttermann, Noël, & Memmert, 2018). To help players master this soft skill, coaches should think aloud when demonstrating techniques. Voicing what is happening inside our head allows players to hear the thought process that drives the action.
Revisiting our example: During the first demonstration at game-speed I think aloud as the play is executed. It may sound like this: “I scan, see the defender, orient my hips, see the pass, pressure comes with ball, I receive across my body.”
During the second demonstration at half-speed I will describe what my foot is doing (the key aspect of the skill I decided to focus on) to help players focus on it. “My toe is pointed away from the ball, I make contact near my heel and caress the ball forward.”
On the final demonstration I return to thinking aloud again, which will sound like my first repetition.
Putting all of the pieces together, coaches should first Name the skill, Demonstrate it, and while demonstrating they need to Think Aloud. The goal is to develop players’ hard skills in conjunction with their soft skills (cue recognition, situational awareness, decision making, etc.) otherwise they’ll lack the mental acuity to use them.
Correct Repetition
After the demonstration, players must then get their own repetitions in. It is the coach’s responsibility to give high-quality feedback at this time, but it must be balanced with the efficiency of time. The more time players spend listening to feedback, the less time they spend practicing the skill.
Fortunately, we can lean on the teaching methods of John Wooden (documented by Gallimore & Tharp, 2004) to strike the appropriate balance.
Wooden had a three-step process that harnessed the power of observational learning to improve players. First, Wooden would model the skill the way it was meant to be performed, then he’d demonstrate what the player was doing wrong, and finally give one more correct model.
It’s a good way to get a player’s attention, make a coaching point, then let them keep trying. The effectiveness is multiplied when you use your voice to cue them in on a key aspect of the technique that they’re performing incorrectly.
Here’s what this example would look like in action:
[During the first correct demonstration] “Owen, watch this. My hips are open so the ball can roll in front of me.”
[Then give the incorrect demonstration] “This is what you were doing: Your hips are pointed toward the ball so it can’t roll in front of you.”
[Ending with one more correct demonstration] “Try this instead: Leave your hips open and let the ball roll in front of you.”
Conclusion
Teaching skills is a crucial part of coaching, especially those who work with young players. Being able to break down the teaching process into distinct stages helps us refine our craft and find areas of improvement. Being specific in what you are teaching, providing visual examples so players can see how a skill is performed, thinking aloud so players can refine their decision making and situational recognition, and then providing concise feedback when they are practicing those skills all contribute to a high-quality learning environment. While designing an optimal exercise is a crucial component in the skill-acquirement arena, applying these methods can help coaches fulfill their teaching potential regardless of the activity chosen.
Sources:
Bandura, A. (2008). Observational learning. The international encyclopedia of communication.
Gallimore, R., & Tharp, R. (2004). What a coach can teach a teacher, 1975-2004: Reflections and reanalysis of John Wooden’s teaching practices. The Sport Psychologist, 18(2), 119-137.
Hüttermann, S., Noël, B., & Memmert, D. (2018). Eye tracking in high-performance sports: Evaluation of its application in expert athletes. IJCSS, 17(2), 182-203.


